一、Mask RCNN简介

区域卷积神经网络 RCNN(Region-Convolutional Neural Networks)为两阶段目标检测器。通过对图像生成候选区域,提取特征,判别特征类别并修正候选框位置。 RCNN系列目前包含两个代表模型:Faster RCNN,Mask RCNN。

Mask R-CNN是He Kaiming大神2017年的力作,其在进行目标检测的同时进行实例分割,取得了出色的效果。

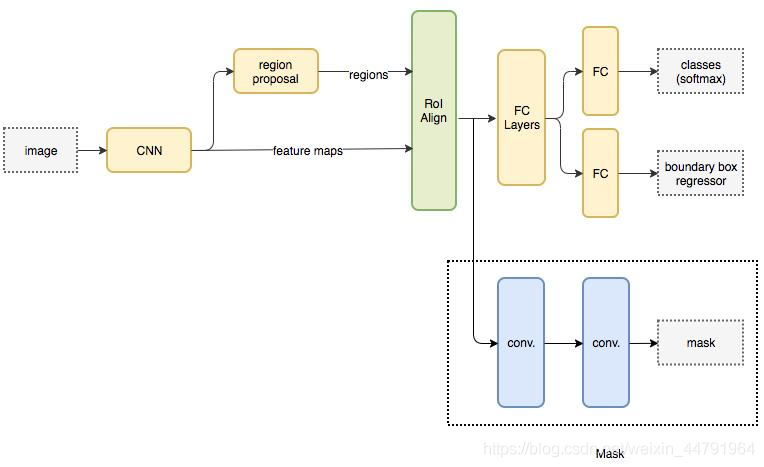
Mask-RCNN使用Resnet101作为主干特征提取网络,也就是图中的CNN部分,其对输入的图像image要求其是正方形且宽高可以整除2的6次方,不足的将会在外侧添加灰色区域。

  1. Resnet101主干特征提取(CNN)

一张图像image传入到 Resnet101(CNN) 之后,会对其进行特征提取,然后将图像长宽压缩两次、三次、四次、五次来构造特征金字塔,目的是为了实现特征多尺度融合。

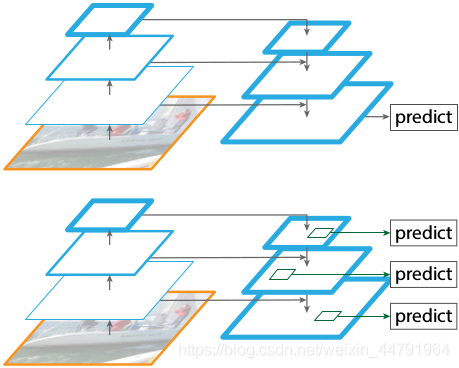
也就是下图中的左侧部分,分别得到了C2、C3、C4、C5五种特征层(五种尺寸的图像)。

  • P5:对最小的C5(32,32)图像进行二维卷积,然后再次卷积作为一个有效特征层P5(32,32)(下方绿色框)
  • P6:将P5(32,32)最大池化得到有效特征层P6(16,16)。
  • P4:将C5(32,32)一次卷积的结果上采样得到(64,64)图像,与C4(64,64)进行Add运算,然后再次卷积得到另一个有效特征层P4。
  • P3:将C4一次卷积结果上采样,并与C3进行Add运算,然后再次卷积得到有效特征层P3。
  • P2:将C3一次卷积结果上采样,并与C2进行Add运算,再次卷积得到有效特征层P2。

提取到的P2、P3、P4、P5、P6五个有效特征层,就是Resent101的输出feature maps,可以用于接下来RPN建议网络获取建议框。

  1. RPN区域建议网络(Region Proposal)

对有效特征层使用RPN建议网络(region proposal),获得许多建议框regions,这些建议框可能包含物体,可能没包含物体。不管包括没包括,接下来都会利用这些建议框截取P2~P5的图像,得到一个个可能存在目标的截取图像(P6不截取)。

  1. ROI区域对齐(ROI Align)

对于所有建议框截取图像,RoI Align都会将其调整图像尺寸为一个正方形,便于后续特征的匹配操作。

  1. FC Layers

根据截取出的建议框图像,利用Classifier回归模型判断截取的区域是否有物体,然后利用Classifier预测框网络对有效特征层进行解码获得最终的预测框。

  1. Mask语义分割网络

利用获取的最终预测框,再次在有效特征层P2~P5中截取目标图像(这次由于相当于进行了以便筛选,截取出的图像数量会少很多),将这次截取出的图像传给Mask语义分割网络进行语义分割。

二、Mask R-CNN实现过程

2.1 Resnet101-主干特征提取网络
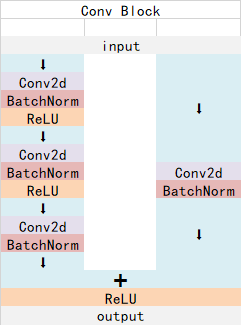
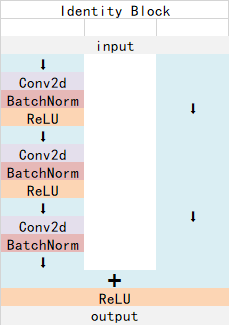
ResNet101有两个基本的块,分别是Conv BlockIdentity Block。其中Conv Block的输入和输出维度不同,不能持续串联,它的作用是改变网络的维度;Identity Block的输入维度和输出维度相同,可以串联,用于加深网络。

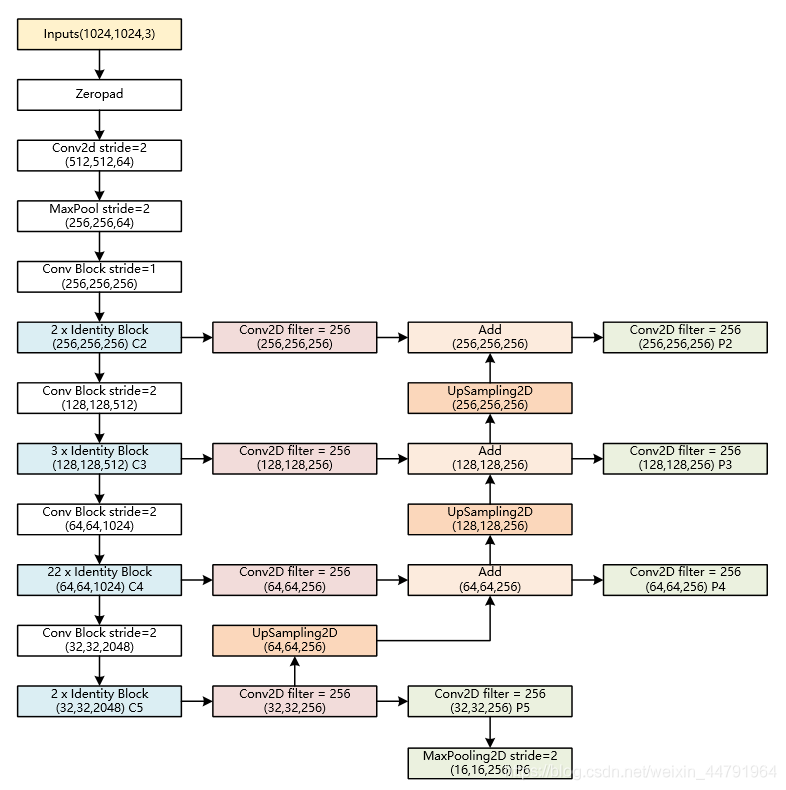
以coco数据集中输入的shape为例,输入的shape为1024x1024,shape变化如下:

我们取出长宽压缩了两次、三次、四次、五次的结果来进行下面特征金字塔结构的构造。

相关代码:

1
2
3
4
5
6
7
8
9
10
11
12
13
14
15
16
17
18
19
20
21
22
23
24
25
26
27
28
29
30
31
32
33
34
35
36
37
38
39
40
41
42
43
44
45
46
47
48
49
50
51
52
53
54
55
56
57
58
59
60
61
62
63
64
65
66
67
68
69
70
71
72
73
74
75
76
77
78
79
80
81
82
83
84
85
86
87
88
89
90
91
92
from keras.layers import ZeroPadding2D,Conv2D,MaxPooling2D,BatchNormalization,Activation,Add


def identity_block(input_tensor, kernel_size, filters, stage, block,
use_bias=True, train_bn=True):
nb_filter1, nb_filter2, nb_filter3 = filters
conv_name_base = 'res' + str(stage) + block + '_branch'
bn_name_base = 'bn' + str(stage) + block + '_branch'

x = Conv2D(nb_filter1, (1, 1), name=conv_name_base + '2a',
use_bias=use_bias)(input_tensor)
x = BatchNormalization(name=bn_name_base + '2a')(x, training=train_bn)
x = Activation('relu')(x)

x = Conv2D(nb_filter2, (kernel_size, kernel_size), padding='same',
name=conv_name_base + '2b', use_bias=use_bias)(x)
x = BatchNormalization(name=bn_name_base + '2b')(x, training=train_bn)
x = Activation('relu')(x)

x = Conv2D(nb_filter3, (1, 1), name=conv_name_base + '2c',
use_bias=use_bias)(x)
x = BatchNormalization(name=bn_name_base + '2c')(x, training=train_bn)

x = Add()([x, input_tensor])
x = Activation('relu', name='res' + str(stage) + block + '_out')(x)
return x

def conv_block(input_tensor, kernel_size, filters, stage, block,
strides=(2, 2), use_bias=True, train_bn=True):

nb_filter1, nb_filter2, nb_filter3 = filters
conv_name_base = 'res' + str(stage) + block + '_branch'
bn_name_base = 'bn' + str(stage) + block + '_branch'

x = Conv2D(nb_filter1, (1, 1), strides=strides,
name=conv_name_base + '2a', use_bias=use_bias)(input_tensor)
x = BatchNormalization(name=bn_name_base + '2a')(x, training=train_bn)
x = Activation('relu')(x)

x = Conv2D(nb_filter2, (kernel_size, kernel_size), padding='same',
name=conv_name_base + '2b', use_bias=use_bias)(x)
x = BatchNormalization(name=bn_name_base + '2b')(x, training=train_bn)
x = Activation('relu')(x)

x = Conv2D(nb_filter3, (1, 1), name=conv_name_base +
'2c', use_bias=use_bias)(x)
x = BatchNormalization(name=bn_name_base + '2c')(x, training=train_bn)

shortcut = Conv2D(nb_filter3, (1, 1), strides=strides,
name=conv_name_base + '1', use_bias=use_bias)(input_tensor)
shortcut = BatchNormalization(name=bn_name_base + '1')(shortcut, training=train_bn)

x = Add()([x, shortcut])
x = Activation('relu', name='res' + str(stage) + block + '_out')(x)
return x

def get_resnet(input_image,stage5=False, train_bn=True):
# Stage 1
x = ZeroPadding2D((3, 3))(input_image)
x = Conv2D(64, (7, 7), strides=(2, 2), name='conv1', use_bias=True)(x)
x = BatchNormalization(name='bn_conv1')(x, training=train_bn)
x = Activation('relu')(x)
# Height/4,Width/4,64
C1 = x = MaxPooling2D((3, 3), strides=(2, 2), padding="same")(x)
# Stage 2
x = conv_block(x, 3, [64, 64, 256], stage=2, block='a', strides=(1, 1), train_bn=train_bn)
x = identity_block(x, 3, [64, 64, 256], stage=2, block='b', train_bn=train_bn)
# Height/4,Width/4,256
C2 = x = identity_block(x, 3, [64, 64, 256], stage=2, block='c', train_bn=train_bn)
# Stage 3
x = conv_block(x, 3, [128, 128, 512], stage=3, block='a', train_bn=train_bn)
x = identity_block(x, 3, [128, 128, 512], stage=3, block='b', train_bn=train_bn)
x = identity_block(x, 3, [128, 128, 512], stage=3, block='c', train_bn=train_bn)
# Height/8,Width/8,512
C3 = x = identity_block(x, 3, [128, 128, 512], stage=3, block='d', train_bn=train_bn)
# Stage 4
x = conv_block(x, 3, [256, 256, 1024], stage=4, block='a', train_bn=train_bn)
block_count = 22
for i in range(block_count):
x = identity_block(x, 3, [256, 256, 1024], stage=4, block=chr(98 + i), train_bn=train_bn)
# Height/16,Width/16,1024
C4 = x
# Stage 5
if stage5:
x = conv_block(x, 3, [512, 512, 2048], stage=5, block='a', train_bn=train_bn)
x = identity_block(x, 3, [512, 512, 2048], stage=5, block='b', train_bn=train_bn)
# Height/32,Width/32,2048
C5 = x = identity_block(x, 3, [512, 512, 2048], stage=5, block='c', train_bn=train_bn)
else:
C5 = None
return [C1, C2, C3, C4, C5]

关于残差神经网络,可以参考此文章:ResNet:残差神经网络

2.2 Feature Pyramid-FPN构建特征金字塔

上文经过主干特征提取后可以得到长宽压缩了两次C2、三次C3、四次C4、五次C5的结果,用这些结果进行特征金字塔的构造,主要是为了得到P2~P6五个有效特征层。

具体过程为:

  • P5:对【C5】进行一次256通道的卷积,再进行一次256通道的卷积,得到P5。
  • P6:将P5进行最大池化得到P6。
  • P4:将【C5一次卷积的结果】进行上采样,再与【C4进行256通道卷积的结果】的进行Add运算,再进行一次256通道的卷积,得到P4。
  • P3、P2过程类似P4。

提取到的P2、P3、P4、P5、P6可以作为RPN网络的有效特征层,利用RPN建议框网络对有效特征层进行下一步的操作,对先验框进行解码获得建议框。

提取到的P2、P3、P4、P5可以作为Classifier和Mask网络的有效特征层,利用Classifier预测框网络对有效特征层进行下一步的操作,对建议框解码获得最终预测框;利用Mask语义分割网络对有效特征层进行下一步的操作,获得每一个预测框内部的语义分割结果。

具体代码

1
2
3
4
5
6
7
8
9
10
11
12
13
14
15
16
17
18
19
20
21
22
23
24
25
26
27
28
29
30
31
32
33
34
35
36
37
38
39
40
41
# 获得Resnet里的压缩程度不同的一些层
_, C2, C3, C4, C5 = get_resnet(input_image, stage5=True, train_bn=config.TRAIN_BN)

# 组合成特征金字塔的结构
# P5长宽共压缩了5次
# Height/32,Width/32,256
P5 = Conv2D(config.TOP_DOWN_PYRAMID_SIZE, (1, 1), name='fpn_c5p5')(C5)
# P4长宽共压缩了4次
# Height/16,Width/16,256
P4 = Add(name="fpn_p4add")([
UpSampling2D(size=(2, 2), name="fpn_p5upsampled")(P5),
Conv2D(config.TOP_DOWN_PYRAMID_SIZE, (1, 1), name='fpn_c4p4')(C4)])
# P4长宽共压缩了3次
# Height/8,Width/8,256
P3 = Add(name="fpn_p3add")([
UpSampling2D(size=(2, 2), name="fpn_p4upsampled")(P4),
Conv2D(config.TOP_DOWN_PYRAMID_SIZE, (1, 1), name='fpn_c3p3')(C3)])
# P4长宽共压缩了2次
# Height/4,Width/4,256
P2 = Add(name="fpn_p2add")([
UpSampling2D(size=(2, 2), name="fpn_p3upsampled")(P3),
Conv2D(config.TOP_DOWN_PYRAMID_SIZE, (1, 1), name='fpn_c2p2')(C2)])

# 各自进行一次256通道的卷积,此时P2、P3、P4、P5通道数相同
# Height/4,Width/4,256
P2 = Conv2D(config.TOP_DOWN_PYRAMID_SIZE, (3, 3), padding="SAME", name="fpn_p2")(P2)
# Height/8,Width/8,256
P3 = Conv2D(config.TOP_DOWN_PYRAMID_SIZE, (3, 3), padding="SAME", name="fpn_p3")(P3)
# Height/16,Width/16,256
P4 = Conv2D(config.TOP_DOWN_PYRAMID_SIZE, (3, 3), padding="SAME", name="fpn_p4")(P4)
# Height/32,Width/32,256
P5 = Conv2D(config.TOP_DOWN_PYRAMID_SIZE, (3, 3), padding="SAME", name="fpn_p5")(P5)
# 在建议框网络里面还有一个P6用于获取建议框
# Height/64,Width/64,256
P6 = MaxPooling2D(pool_size=(1, 1), strides=2, name="fpn_p6")(P5)

# P2, P3, P4, P5, P6可以用于获取建议框
rpn_feature_maps = [P2, P3, P4, P5, P6]
# P2, P3, P4, P5用于获取mask信息
mrcnn_feature_maps = [P2, P3, P4, P5]

2.3 构建RPN建议网络模型

RPN建议网络的模型

  • 首先进行一次3x3的通道为512的卷积
  • 然后分别进行一次anchors_per_location x 2的卷积和anchors_per_location x 4的卷积。
    • anchors_per_location x 2的卷积用于预测公共特征层上 每一个网格点上 每一个预测框内部是否包含物体。
    • anchors_per_location x 4的卷积用于预测公共特征层上 每一个网格点上 每一个先验框的变化情况。

例如输入图片的shape是1024x1024x3时,公共特征层的shape就是256x256x256、128x128x256、64x64x256、32x32x256、16x16x256。这些公共特征层上的每一个点,映射到原始图片上就是间隔不同的网格点,每个网格默认存在3(anchors_per_location)个先验框,这些先验框有不同的大小。

anchors_per_location x 4的卷积的结果会对这些先验框进行调整,获得一个新的框。
anchors_per_location x 2的卷积会判断上述获得的新框是否包含物体。

到这里我们可以获得了一些有用的框,这些框会利用anchors_per_location x 2的卷积判断是否存在物体。

实现代码如下:

1
2
3
4
5
6
7
8
9
10
11
12
13
14
15
16
17
18
19
20
21
22
23
24
25
26
27
28
29
30
31
32
33
34
35
36
37
38
39
40
41
42
43
44
45
46
47
#------------------------------------#
#   五个不同大小的特征层会传入到
#   RPN当中,获得建议框
#------------------------------------#

def rpn_graph(feature_map, anchors_per_location):
    #------------------------------------#
    #   利用一个3x3卷积进行特征整合,基础的层
    #------------------------------------#
    shared = Conv2D(512, (3, 3), padding='same', activation='relu', name='rpn_conv_shared')(feature_map)
   
    #------------------------------------#
    #   batch_size, num_anchors, 2
    #   代表这个先验框是否包含物体
    #   anchor_per_location的默认值是3
    #   意味着特征层对图像进行网格的划分后,每个网格上先验框的数量是3
    #------------------------------------#
    x = Conv2D(anchors_per_location * 2, (1, 1), padding='valid', activation='linear', name='rpn_class_raw')(shared)

    # reshape到最后一个维度是2的维度,是一个分类网络,有非常多先验框
    rpn_class_logits = Reshape([-1,2])(x)
    rpn_probs = Activation("softmax", name="rpn_class_xxx")(rpn_class_logits)

    #------------------------------------#
    #   batch_size, num_anchors, 4
    #   这个先验框的调整参数
    #------------------------------------#
    x = Conv2D(anchors_per_location * 4, (1, 1), padding="valid", activation='linear', name='rpn_bbox_pred')(shared)
    rpn_bbox = Reshape([-1, 4])(x)

    # 输出包括:
    # 先验框是否真实的包含物体
    # bbox先验框的调整参数
    return [rpn_class_logits, rpn_probs, rpn_bbox]


#------------------------------------#
#   建立建议框网络模型
#   RPN模型
#------------------------------------#
def build_rpn_model(anchors_per_location, depth):
    # 输入的长和宽都是None,代表输入的有效特征层大小是变化的,256、64等都可以
    # 输入的depth是256
    input_feature_map = Input(shape=[None, None, depth], name="input_rpn_feature_map")
    # 将输入的图像传入到rpn_graph中
    outputs = rpn_graph(input_feature_map, anchors_per_location)
    return Model([input_feature_map], outputs, name="rpn_model")

2.4 Anchors先验框的获取

先验框就是图像上的一定的区域,这些区域是人为规定好的,这些区域可能包含物体,可能不包含物体,我们网络的预测结果就会判断哪些先验框是包含物体的,然后对先验框进行调整。

在MaskRCNN中,建议框网络的预测结果就会对这些先验框进行调整,获得建议框,并判断哪些先验框是包含物体的。

本节介绍如何获得先验框

1
2
3
4
5
6
7
8
9
10
11
12
13
14
15
16
17
18
19
20
21
22
23
24
25
26
27
28
29
30
31
32
33
34
35
36
37
38
39
40
41
42
43
44
45
46
47
48
49
50
51
52
53
54
55
56
57
58
59
60
61
62
63
64
65
66
67
68
69
70
71
72
73
74
75
76
77
78
79
80
81
82
83
84
85
86
87
88
89
90
91
#----------------------------------------------------------#
#  Anchors
#----------------------------------------------------------#
def generate_anchors(scales, ratios, shape, feature_stride, anchor_stride):
    #----------------------------------------------------------#
    #   获得所有框的长度和比例的组合
    #   相当于在每一个网格点上获得了两个长方形(1:2)、(2:1)和一个正方形
    #----------------------------------------------------------#
    scales, ratios = np.meshgrid(np.array(scales), np.array(ratios))
    scales = scales.flatten()
    ratios = ratios.flatten()
    heights = scales / np.sqrt(ratios)
    widths = scales * np.sqrt(ratios)

    #----------------------------------------------------------#
    #   生成网格中心
    #----------------------------------------------------------#
    shifts_y = np.arange(0, shape[0], anchor_stride) * feature_stride
    shifts_x = np.arange(0, shape[1], anchor_stride) * feature_stride
    shifts_x, shifts_y = np.meshgrid(shifts_x, shifts_y)

    #----------------------------------------------------------#
    #   获得先验框的中心和宽高
    #----------------------------------------------------------#
    box_widths, box_centers_x = np.meshgrid(widths, shifts_x)
    box_heights, box_centers_y = np.meshgrid(heights, shifts_y)

    #----------------------------------------------------------#
    #   更变格式
    #----------------------------------------------------------#
    # 对先验框的中心堆叠,然后reshape,reshape后的结果代表每一个先验框的中心坐标
    box_centers = np.stack([box_centers_y, box_centers_x], axis=2).reshape([-1, 2])
    # 对先验框的高和宽堆叠,然后reshape,reshape后的结果代表每一个先验框的高和宽
    box_sizes = np.stack([box_heights, box_widths], axis=2).reshape([-1, 2])

    #----------------------------------------------------------#
    #   计算出(y1, x1, y2, x2)
    #----------------------------------------------------------#
    boxes = np.concatenate([box_centers - 0.5 * box_sizes, box_centers + 0.5 * box_sizes], axis=1)

    return boxes


# 生成特征金字塔先验框
def generate_pyramid_anchors(scales, ratios, feature_shapes, feature_strides, anchor_stride):
    """
    生成不同特征层的anchors,并利用concatenate进行堆叠
    """
    #----------------------------------------------------------#
    #   Anchors
    #   [anchor_count, (y1, x1, y2, x2)]
    #   P2对应的scale是32
    #   P3对应的scale是64
    #   P4对应的scale是128
    #   P5对应的scale是256
    #   P6对应的scale是512
    #----------------------------------------------------------#
    anchors = []
   
    # 对scales进行for循环,是传入的anchor_scales,是32、64、128、256、512
    # 对应不同特征层上先验框的基础大小,再在此基础上获得调整,获得不同长宽大小的先验框
    for i in range(len(scales)):
        # ratio的值是0.5、1、2,对应每个网格点上三个先验框
        # feature_shapes就是获得的每一个有效特征层的大小,代表我们要将图片分割成多少网格
        # feature_strides对应backbone_strides,是4、8、16、32、64
        # anchor_stride的值为1
        anchors.append(generate_anchors(scales[i], ratios, feature_shapes[i], feature_strides[i], anchor_stride))

    return np.concatenate(anchors, axis=0)

def compute_backbone_shapes(config, image_shape):
    return np.array( [[int(math.ceil(image_shape[0] / stride)), int(math.ceil(image_shape[1] / stride))] for stride in config.BACKBONE_STRIDES])
   

# 利用下面的函数获取先验框
def get_anchors(config, image_shape):
    # 计算主干特征提取网络获得的有效特征层的shape
    # 为了事先放置先验框,我们需要知道网格大小,因此需要先获得有效特征层的shape
    backbone_shapes = compute_backbone_shapes(config, image_shape)
    anchor_cache = {}
    if not tuple(image_shape) in anchor_cache:
        # 将backbone_shapes传入下面的函数
        # 生成特征金字塔的先验框
        a = generate_pyramid_anchors(
            config.RPN_ANCHOR_SCALES,
            config.RPN_ANCHOR_RATIOS,
            backbone_shapes,
            config.BACKBONE_STRIDES,
            config.RPN_ANCHOR_STRIDE)
        anchor_cache[tuple(image_shape)] = norm_boxes(a, image_shape[:2])
    return anchor_cache[tuple(image_shape)]

2.5 先验框调整获得建议框

利用ProposalLayer对先验框解码获取建议框。

1
2
3
4
5
6
7
8
    #------------------------------------------------------------------#
    #   对先验框进行解码,获得先验框解码后的建议框的坐标
    #   rpn_rois            : Batch_size, proposal_count, 4
    #------------------------------------------------------------------#

    proposal_count = config.POST_NMS_ROIS_TRAINING
    rpn_rois = ProposalLayer(proposal_count=proposal_count, nms_threshold=config.RPN_NMS_THRESHOLD, name="ROI", config=config)([rpn_class, rpn_bbox, anchors])
    active_class_ids = Lambda(lambda x: parse_image_meta_graph(x)["active_class_ids"])(input_image_meta)

输入参数有三个分别是rpn_classrpn_bboxanchors,这里的rpn_class代表所有先验框是否包含物体的置信度,rpn_bbox代表所有先验框的调整参数,anchors之前获得的所有先验框。

其中ProposalLayer的具体代码如下:

1
2
3
4
5
6
7
8
9
10
11
12
13
14
15
16
17
18
19
20
21
22
23
24
25
26
27
28
29
30
31
32
33
34
35
36
37
38
39
40
41
42
43
44
45
46
47
48
49
50
51
52
53
54
55
56
57
58
59
60
61
62
63
64
65
66
67
68
69
70
71
72
73
74
75
76
77
78
79
80
81
82
83
84
85
#----------------------------------------------------------#
#   Proposal Layer
#   该部分代码用于将先验框转化成建议框
#----------------------------------------------------------#

class ProposalLayer(Layer):
    def __init__(self, proposal_count, nms_threshold, config=None, **kwargs):
        super(ProposalLayer, self).__init__(**kwargs)
        self.config = config
        self.proposal_count = proposal_count
        self.nms_threshold = nms_threshold

    def call(self, inputs):
        #----------------------------------------------------------#
        #   输入的inputs有三个内容
        #   inputs[0]   rpn_class   : Batch_size, num_anchors, 2
        #   inputs[1]   rpn_bbox    : Batch_size, num_anchors, 4
        #   inputs[2]   anchors     : Batch_size, num_anchors, 4
        #----------------------------------------------------------#

        #----------------------------------------------------------#
        #   获得先验框内部是否有物体[Batch_size, num_anchors, 1]
        #----------------------------------------------------------#
        scores = inputs[0][:, :, 1]

        #----------------------------------------------------------#
        #   获得先验框的调整参数[batch, num_rois, 4]
        #----------------------------------------------------------#
        deltas = inputs[1]

        #----------------------------------------------------------#
        #   获得先验框的坐标
        #----------------------------------------------------------#
        anchors = inputs[2]

        #----------------------------------------------------------#
        #   RPN_BBOX_STD_DEV[0.1 0.1 0.2 0.2] 改变数量级
        #----------------------------------------------------------#
        deltas = deltas * np.reshape(self.config.RPN_BBOX_STD_DEV, [1, 1, 4])

        #----------------------------------------------------------#
        #   筛选出得分前6000个的框
        #----------------------------------------------------------#
        pre_nms_limit = tf.minimum(self.config.PRE_NMS_LIMIT, tf.shape(anchors)[1])

        #----------------------------------------------------------#
        #   获得这些框的索引
        #----------------------------------------------------------#
        ix = tf.nn.top_k(scores, pre_nms_limit, sorted=True, name="top_anchors").indices

        #----------------------------------------------------------#
        #   获得先验框、及其得分与调整参数
        #----------------------------------------------------------#
        scores = batch_slice([scores, ix], lambda x, y: tf.gather(x, y), self.config.IMAGES_PER_GPU)
        deltas = batch_slice([deltas, ix], lambda x, y: tf.gather(x, y), self.config.IMAGES_PER_GPU)
        pre_nms_anchors = batch_slice([anchors, ix], lambda a, x: tf.gather(a, x), self.config.IMAGES_PER_GPU, names=["pre_nms_anchors"])

        #----------------------------------------------------------#
        #   [batch, pre_nms_limit, (y1, x1, y2, x2)]
        #   对先验框进行解码
        #----------------------------------------------------------#
        boxes = batch_slice([pre_nms_anchors, deltas], lambda x, y: apply_box_deltas_graph(x, y), self.config.IMAGES_PER_GPU, names=["refined_anchors"])

        #----------------------------------------------------------#
        #   [batch, pre_nms_limit, (y1, x1, y2, x2)]
        #   防止超出图片范围
        #----------------------------------------------------------#
        window = np.array([0, 0, 1, 1], dtype=np.float32)
        boxes = batch_slice(boxes, lambda x: clip_boxes_graph(x, window), self.config.IMAGES_PER_GPU, names=["refined_anchors_clipped"])

        #---------------------------------------------------------#
        #   在非极大抑制后
        #   获得一个shape为[batch, NMS_ROIS, 4]的proposals
        #---------------------------------------------------------#
        def nms(boxes, scores):
            indices = tf.image.non_max_suppression(boxes, scores, self.proposal_count, self.nms_threshold, name="rpn_non_max_suppression")
            proposals = tf.gather(boxes, indices)
            padding = tf.maximum(self.proposal_count - tf.shape(proposals)[0], 0)
            proposals = tf.pad(proposals, [(0, padding), (0, 0)])
            return proposals
        proposals = batch_slice([boxes, scores], nms, self.config.IMAGES_PER_GPU)
        return proposals

    def compute_output_shape(self, input_shape):
        return (None, self.proposal_count, 4)

其中利用到了下面的函数对建议框的位置和长宽进行调整

1
2
3
4
5
6
7
8
9
10
11
12
13
14
15
16
17
18
19
20
21
22
23
24
25
26
27
28
29
30
#------------------------------------------------------------------#
#   利用先验框调整参数调整先验框,获得建议框的坐标
#------------------------------------------------------------------#
def apply_box_deltas_graph(boxes, deltas):
    #---------------------------------------#
    #   计算先验框的中心和宽高
    #---------------------------------------#
    height = boxes[:, 2] - boxes[:, 0]
    width = boxes[:, 3] - boxes[:, 1]
    center_y = boxes[:, 0] + 0.5 * height
    center_x = boxes[:, 1] + 0.5 * width

    #---------------------------------------#
    #   计算出调整后的先验框的中心和宽高
    #---------------------------------------#
    center_y += deltas[:, 0] * height
    center_x += deltas[:, 1] * width
    height *= tf.exp(deltas[:, 2])
    width *= tf.exp(deltas[:, 3])

    #---------------------------------------#
    #   计算左上角和右下角的点的坐标
    #---------------------------------------#
    y1 = center_y - 0.5 * height
    x1 = center_x - 0.5 * width
    y2 = y1 + height
    x2 = x1 + width

    result = tf.stack([y1, x1, y2, x2], axis=1, name="apply_box_deltas_out")
    return result

2.6 利用建议框对共享特征层进行截取

ROI Align层的作用就是根据建议框对不同的特征层进行截取。主要代码如下,其功能就是根据建议框的大小,判断建议框属于哪一个特征层,然后利用建议框对对应的特征层进行截取。

1
2
3
4
5
6
7
8
9
    #---------------------------------------------------------------#
    #   ROI Pooling,利用建议框在特征层上进行截取
    #   x   : [batch, num_rois, POOL_SIZE, POOL_SIZE, channels]
    #   pool_size 是对共享特征层截取后resize后的局部特征层的大小
    #   rois是初步筛选后的建议框
    #   image_meta是保存了图片的必要信息
    #   feature_maps共享特征层
    #---------------------------------------------------------------#
    x = PyramidROIAlign([pool_size, pool_size], name="roi_align_classifier")([rois, image_meta] + feature_maps)

其中PyramidROIAlign函数的定义如下:

首先获取建议框的坐标、图片信息、特征层。然后根据建议框的大小,判断建议框属于哪一个特征层(较大的特征层比如256x256的,网格划分密集,每一个建议框大小比较小,以此判断)。利用循环对于P2~P5五个特征层进行截取。

1
2
3
4
5
6
7
8
9
10
11
12
13
14
15
16
17
18
19
20
21
22
23
24
25
26
27
28
29
30
31
32
33
34
35
36
37
38
39
40
41
42
43
44
45
46
47
48
49
50
51
52
53
54
55
56
57
58
59
60
61
62
63
64
65
66
67
68
69
70
71
72
73
74
75
76
77
78
79
80
81
82
83
84
85
86
87
88
89
90
91
92
93
94
95
96
97
98
99
#----------------------------------------------------------#
#   ROIAlign Layer
#   利用建议框在特征层上截取内容
#----------------------------------------------------------#
class PyramidROIAlign(Layer):
    def __init__(self, pool_shape, **kwargs):
        super(PyramidROIAlign, self).__init__(**kwargs)
        self.pool_shape = tuple(pool_shape)

    def call(self, inputs):
        #----------------------------------------------------------#
        #   获得建议框的坐标
        #----------------------------------------------------------#
        boxes = inputs[0]
        #----------------------------------------------------------#
        #   image_meta包含了一些必要的图片信息
        #----------------------------------------------------------#
        image_meta = inputs[1]
        #----------------------------------------------------------#
        #   取出所有的特征层[batch, height, width, channels]
        #----------------------------------------------------------#
        feature_maps = inputs[2:]

        #----------------------------------------------------------#
        #   获得建议框的宽高
        #----------------------------------------------------------#
        y1, x1, y2, x2 = tf.split(boxes, 4, axis=2)
        h = y2 - y1
        w = x2 - x1

        #----------------------------------------------------------#
        #   获得输入进来的图像的大小,对image的内容进行分割
        #----------------------------------------------------------#
        image_shape = parse_image_meta_graph(image_meta)['image_shape'][0]
        #----------------------------------------------------------#
        #   通过建议框的大小找到这个建议框属于哪个特征层,第一层256划分区域多建议框较小32
        #----------------------------------------------------------#
        image_area = tf.cast(image_shape[0] * image_shape[1], tf.float32)
        roi_level = log2_graph(tf.sqrt(h * w) / (224.0 / tf.sqrt(image_area)))
        roi_level = tf.minimum(5, tf.maximum(2, 4 + tf.cast(tf.round(roi_level), tf.int32)))
        # roi_level是每张图片里每个建议框对应的特征层是哪个
        roi_level = tf.squeeze(roi_level, 2)

        pooled = []
        box_to_level = []
        # 分别在P2-P5中进行截取
        for i, level in enumerate(range(2, 6)):
            #-----------------------------------------------#
            #   找到每个特征层对应的建议框
            #   level_boxes存放所有属于该特征层的建议框
            #-----------------------------------------------#
            ix = tf.where(tf.equal(roi_level, level))
            level_boxes = tf.gather_nd(boxes, ix)
            box_to_level.append(ix)

            #-----------------------------------------------#
            #    获得这些建议框所属的图片
            #-----------------------------------------------#
            box_indices = tf.cast(ix[:, 0], tf.int32)

            # 停止梯度下降
            level_boxes = tf.stop_gradient(level_boxes)
            box_indices = tf.stop_gradient(box_indices)

            #--------------------------------------------------------------------------#
            #   利用建议框对特征层进行截取  
            #   [batch * num_boxes, pool_height, pool_width, channels]
            #   box_indices表示是截取哪张图片里的特征层
            #--------------------------------------------------------------------------#
            pooled.append(tf.image.crop_and_resize(
                feature_maps[i], level_boxes, box_indices, self.pool_shape,
                method="bilinear"))

        pooled = tf.concat(pooled, axis=0)
        #--------------------------------------------------------------------------#
        #   将顺序和所属的图片进行堆叠
        #--------------------------------------------------------------------------#
        box_to_level = tf.concat(box_to_level, axis=0)
        box_range = tf.expand_dims(tf.range(tf.shape(box_to_level)[0]), 1)
        box_to_level = tf.concat([tf.cast(box_to_level, tf.int32), box_range], axis=1)

        # box_to_level[:, 0]表示第几张图
        # box_to_level[:, 1]表示第几张图里的第几个框
        sorting_tensor = box_to_level[:, 0] * 100000 + box_to_level[:, 1]
        # 进行排序,将同一张图里的某一些聚集在一起
        ix = tf.nn.top_k(sorting_tensor, k=tf.shape(
            box_to_level)[0]).indices[::-1]

        # 按顺序获得图片的索引
        ix = tf.gather(box_to_level[:, 2], ix)
        pooled = tf.gather(pooled, ix)

        #--------------------------------------------------------------------------#
        #   重新reshape为如下
        #   [batch, num_rois, POOL_SIZE, POOL_SIZE, channels]
        #--------------------------------------------------------------------------#
        shape = tf.concat([tf.shape(boxes)[:2], tf.shape(pooled)[1:]], axis=0)
        pooled = tf.reshape(pooled, shape)
        return pooled

2.7 局部公用特征层到预测结果

如何利用调整后的局部特征层获得预测结果

1
2
3
4
5
6
7
8
9
    mrcnn_class_logits, mrcnn_class, mrcnn_bbox =\

        fpn_classifier_graph(rpn_rois, mrcnn_feature_maps, input_image_meta,

                                config.POOL_SIZE, config.NUM_CLASSES,

                                train_bn=config.TRAIN_BN,

                                fc_layers_size=config.FPN_CLASSIF_FC_LAYERS_SIZE)
1
2
3
4
5
6
7
8
9
10
11
12
13
14
15
16
17
18
19
20
21
22
23
24
25
26
27
28
29
30
31
32
33
34
35
36
37
38
39
40
41
42
43
44
45
46
47
48
49
50
51
52
53
54
55
56
57
58
59
60
61
62
63
64
65
66
67
68
69
70
71
72
73
74
75
76
77
78
79
80
81
82
83
84
85
86
87
88
89
90
91
92
93
94
95
96
97
98
99
100
101
102
103
104
105
106
107
108
#------------------------------------#
# 建立classifier模型,该函数主要实现目标检测功能
# 这个模型的预测结果会调整建议框
# 获得最终的预测框
#------------------------------------#
def fpn_classifier_graph(rois, feature_maps, image_meta,
pool_size, num_classes, train_bn=True,
fc_layers_size=1024):
#---------------------------------------------------------------#
# ROI Pooling,利用建议框在特征层上进行截取
# x : [batch, num_rois, POOL_SIZE, POOL_SIZE, channels],调整后的局部特征层
# pool_size 是对共享特征层截取后resize后的局部特征层的大小
# rois是初步筛选后的建议框
# image_meta是保存了图片的必要信息
# feature_maps共享特征层
#---------------------------------------------------------------#
x = PyramidROIAlign([pool_size, pool_size], name="roi_align_classifier")([rois, image_meta] + feature_maps)

#------------------------------------------------------------------#
# 利用卷积进行特征整合,首先进行7x7的卷积,相当于两次全连接
# x : [batch, num_rois, 1, 1, fc_layers_size]
#------------------------------------------------------------------#
x = TimeDistributed(Conv2D(fc_layers_size, (pool_size, pool_size), padding="valid"), name="mrcnn_class_conv1")(x)
x = TimeDistributed(BatchNormalization(), name='mrcnn_class_bn1')(x, training=train_bn)
x = Activation('relu')(x)
#------------------------------------------------------------------#
# x : [batch, num_rois, 1, 1, fc_layers_size]
#------------------------------------------------------------------#
x = TimeDistributed(Conv2D(fc_layers_size, (1, 1)), name="mrcnn_class_conv2")(x)
x = TimeDistributed(BatchNormalization(), name='mrcnn_class_bn2')(x, training=train_bn)
x = Activation('relu')(x)

#------------------------------------------------------------------#
# x : [batch, num_rois, fc_layers_size]
#------------------------------------------------------------------#
shared = Lambda(lambda x: K.squeeze(K.squeeze(x, 3), 2), name="pool_squeeze")(x)

#------------------------------------------------------------------#
# Classifier head
# 这个的预测结果代表这个先验框内部的物体的种类
# mrcnn_probs : [batch, num_rois, num_classes],每一张图片里,每一个先验框里面,物体的种类
#------------------------------------------------------------------#
mrcnn_class_logits = TimeDistributed(Dense(num_classes), name='mrcnn_class_logits')(shared)
mrcnn_probs = TimeDistributed(Activation("softmax"), name="mrcnn_class")(mrcnn_class_logits)

#------------------------------------------------------------------#
# BBox head
# 这个的预测结果会对先验框进行调整
# mrcnn_bbox : [batch, num_rois, num_classes, 4]
#------------------------------------------------------------------#
x = TimeDistributed(Dense(num_classes * 4, activation='linear'), name='mrcnn_bbox_fc')(shared)
mrcnn_bbox = Reshape((-1, num_classes, 4), name="mrcnn_bbox")(x)

return mrcnn_class_logits, mrcnn_probs, mrcnn_bbox


#----------------------------------------------#
# 建立mask模型
# 这个模型会利用预测框对特征层进行ROIAlign
# 根据截取下来的特征层进行语义分割
#----------------------------------------------#
def build_fpn_mask_graph(rois, feature_maps, image_meta,
pool_size, num_classes, train_bn=True):
#--------------------------------------------------------------------#
# ROI Pooling,利用预测框在特征层上进行截取
# x : batch, num_rois, MASK_POOL_SIZE, MASK_POOL_SIZE, channels
#--------------------------------------------------------------------#
x = PyramidROIAlign([pool_size, pool_size], name="roi_align_mask")([rois, image_meta] + feature_maps)

#--------------------------------------------------------------------#
# x : batch, num_rois, MASK_POOL_SIZE, MASK_POOL_SIZE, 256
#--------------------------------------------------------------------#
x = TimeDistributed(Conv2D(256, (3, 3), padding="same"), name="mrcnn_mask_conv1")(x)
x = TimeDistributed(BatchNormalization(), name='mrcnn_mask_bn1')(x, training=train_bn)
x = Activation('relu')(x)

#--------------------------------------------------------------------#
# x : batch, num_rois, MASK_POOL_SIZE, MASK_POOL_SIZE, 256
#--------------------------------------------------------------------#
x = TimeDistributed(Conv2D(256, (3, 3), padding="same"), name="mrcnn_mask_conv2")(x)
x = TimeDistributed(BatchNormalization(), name='mrcnn_mask_bn2')(x, training=train_bn)
x = Activation('relu')(x)

#--------------------------------------------------------------------#
# x : batch, num_rois, MASK_POOL_SIZE, MASK_POOL_SIZE, 256
#--------------------------------------------------------------------#
x = TimeDistributed(Conv2D(256, (3, 3), padding="same"), name="mrcnn_mask_conv3")(x)
x = TimeDistributed(BatchNormalization(), name='mrcnn_mask_bn3')(x, training=train_bn)
x = Activation('relu')(x)

#--------------------------------------------------------------------#
# x : batch, num_rois, MASK_POOL_SIZE, MASK_POOL_SIZE, 256
#--------------------------------------------------------------------#
x = TimeDistributed(Conv2D(256, (3, 3), padding="same"), name="mrcnn_mask_conv4")(x)
x = TimeDistributed(BatchNormalization(), name='mrcnn_mask_bn4')(x, training=train_bn)
x = Activation('relu')(x)

#--------------------------------------------------------------------#
# x : batch, num_rois, 2xMASK_POOL_SIZE, 2xMASK_POOL_SIZE, 256
#--------------------------------------------------------------------#
x = TimeDistributed(Conv2DTranspose(256, (2, 2), strides=2, activation="relu"), name="mrcnn_mask_deconv")(x)
#--------------------------------------------------------------------#
# 反卷积后再次进行一个1x1卷积调整通道,
# 使其最终数量为numclasses,代表分的类
# x : batch, num_rois, 2xMASK_POOL_SIZE, 2xMASK_POOL_SIZE, numclasses
#--------------------------------------------------------------------#
x = TimeDistributed(Conv2D(num_classes, (1, 1), strides=1, activation="sigmoid"), name="mrcnn_mask")(x)
return x

2.8 建议框调整获得预测框

1
2
3
4
5
6
#------------------------------------------------------------#
# detections : Batch_size, num_detections, 6
# detection_boxes : Batch_size, num_detections, 4
#------------------------------------------------------------#
detections = DetectionLayer(config, name="mrcnn_detection")([rpn_rois, mrcnn_class, mrcnn_bbox, input_image_meta])
detection_boxes = Lambda(lambda x: x[..., :4])(detections)

我们的工作都发生在DetectionLayer四个参数分别是rpn_rois建议框、mrcnn_class建议内部物体的置信度、mrcnn_bbox建议框的调整参数、input_image_meta输入图片的基本信息。

其中DetectionLayer的定义如下:

1
2
3
4
5
6
7
8
9
10
11
12
13
14
15
16
17
18
19
20
21
22
23
24
25
26
27
28
29
30
31
32
33
34
35
36
37
38
39
40
41
42
43
#----------------------------------------------------------#
# Detection Layer
# 利用classifier的预测结果对建议框进行调整获得预测框
#----------------------------------------------------------#
class DetectionLayer(Layer):
def __init__(self, config=None, **kwargs):
super(DetectionLayer, self).__init__(**kwargs)
self.config = config

def call(self, inputs):
#------------------------------------------------------------------#
# 获得的inputs
# rpn_rois : Batch_size, proposal_count, 4
# mrcnn_class : Batch_size, num_rois, num_classes
# mrcnn_bbox : Batch_size, num_rois, num_classes,
#------------------------------------------------------------------#
rois = inputs[0]
mrcnn_class = inputs[1]
mrcnn_bbox = inputs[2]
image_meta = inputs[3]

#------------------------------------------------------------------#
# 找到window的小数形式,指出原始的图片在调整后(加灰条)图片中的位置
#------------------------------------------------------------------#
m = parse_image_meta_graph(image_meta)
image_shape = m['image_shape'][0]
window = norm_boxes_graph(m['window'], image_shape[:2])

#------------------------------------------------------------------#
# 对每一张图的结果进行解码
#------------------------------------------------------------------#
detections_batch = batch_slice(
[rois, mrcnn_class, mrcnn_bbox, window],
lambda x, y, w, z: refine_detections_graph(x, y, w, z, self.config),
self.config.IMAGES_PER_GPU)

#------------------------------------------------------------#
# 最终输出的shape为
# Batch_size, num_detections, 6]
#------------------------------------------------------------#
return tf.reshape(
detections_batch,
[self.config.BATCH_SIZE, self.config.DETECTION_MAX_INSTANCES, 6])

三、创建自己的数据集

3.1 安装labelme

打开cmd窗口,输入activate tensorflow2激活自己的anaconda环境。

然后安装labelme

1
pip install labelme

安装完成后直接在命令行输入labelme即可打开。

使用label进行标注,将生成的json文件和原始图像jpg,放入同一个文件夹中。

3.2 转换coco格式

参考pypi的labelme2coco包

1
2
3
pip install labelme2coco
# 或者使用清华源
pip install -i https://pypi.tuna.tsinghua.edu.cn/simple labelme2coco
1
labelme2coco path/to/labelme/dir --train_split_rate 0.85

3.2 或者转换成mask掩码图,再数据增广,再转换coco格式

(1)labelme结果转mask掩码图

1
2
3
4
5
6
7
8
9
10
11
12
13
14
15
16
17
18
19
20
21
22
23
24
25
26
27
28
29
30
31
32
33
34
35
36
37
38
39
40
41
42
43
44
45
46
import cv2
import json
import os
import numpy as np
from PIL import Image, ImageDraw

'''
从./images文件夹中读取图片和json文件
生成01_my0003.png和对应的01_my0003.png
分别保存在./images/rgb和./images/label文件夹下(先新建)
'''

obj_dic = {1: 'ammeter', 2: 'realsensebox', 3: 'coffeebox', 4: 'sucker'}
obj_list = list(obj_dic.values())

dataset_dir = "./MaskRCNN"
file_list = os.listdir(dataset_dir)
file_list.sort()
for filename in file_list:
if filename[-4:] != 'json':
continue
img = cv2.imread(os.path.join(dataset_dir, filename[:-5] + ".jpg"))
json_path = os.path.join(dataset_dir, filename)
# 读取标注数据
with open(json_path, 'r') as f:
data = json.load(f)

# 针对每个标注,将其表示为掩码图像
for shape in data['shapes']:
# 新建空白图像
mask_img = Image.new('L', (640, 480), 0) # 注意!修改成自己图片的分辨率
# 读取标签点
label_name = shape['label']
label_index = "%02d" % (obj_list.index(label_name) + 1)
polygon_points = shape['points']
# 绘制区域
mask_img_draw = ImageDraw.Draw(mask_img)
# mask_img_draw.polygon(polygon_points, outline=1, fill=1)
mask_img_draw.polygon(tuple(map(tuple, polygon_points)), outline=1, fill=1)
mask_img = cv2.cvtColor(np.array(mask_img)*255, cv2.COLOR_GRAY2BGR)
# 将掩码图像保存为PNG文件
mask_path = os.path.join(dataset_dir + "/label", label_index + "_" + filename)[:-5] + ".png"
img_path = os.path.join(dataset_dir + "/rgb", label_index + "_" + filename)[:-5] + ".png"
cv2.imwrite(mask_path, mask_img)
cv2.imwrite(img_path, img)

(2)数据增广

将rgb图和mask掩码图做同样的变换,得到数据增广的rgb和mask掩码图

1
2
3
4
5
6
7
8
9
10
11
12
13
14
15
16
17
18
19
20
21
22
23
24
25
26
27
28
29
30
31
32
33
34
35
36
37
38
39
40
41
42
43
44
45
46
47
48
49
50
51
52
53
54
55
56
57
58
59
60
61
62
63
64
65
66
67
68
69
70
71
72
import imgaug.augmenters as iaa
from imgaug.augmentables.segmaps import SegmentationMapsOnImage
import cv2
import os
import numpy as np

'''
从./MaskRCNN/rgb中读取rgb图像,从./MaskRCNN/label中读取mask图像
生成数据增广的rgb图像保存在./MaskRCNN/rgb_aug中,mask掩码图保存在./MaskRCNN/label_aug中(先新建)
'''

# 图像数据增强
def data_augmentation(images_folder_path, output_folder_path, augment_times=3):
# 定义数据增强操作
seq = iaa.Sequential([
iaa.Sometimes(0.5, iaa.GaussianBlur(sigma=(0, 0.5))),
iaa.Affine(
scale={"x": (0.8, 1.2), "y": (0.8, 1.2)},
translate_percent={"x": (-0.2, 0.2), "y": (-0.2, 0.2)},
rotate=(-45, 45),
shear=(-16, 16)
),
iaa.SomeOf((0, 5), [
iaa.OneOf([
iaa.Dropout(p=(0, 0.1)),
iaa.CoarseDropout(p=(0, 0.1), size_percent=(0.02, 0.05)),
]),
iaa.AddToHueAndSaturation(value=(-10, 10), per_channel=True),
iaa.LinearContrast(alpha=(0.95, 1.05), per_channel=True),
iaa.AdditiveGaussianNoise(scale=(0, 0.05 * 255), per_channel=True),
iaa.Multiply((0.8, 1.2), per_channel=0.2),
], random_order=True)
])

# 获取图片列表
img_list = os.listdir(images_folder_path)
# 对每张图片进行增强
for img_name in img_list:
img_path = os.path.join(images_folder_path, img_name)
mask_path = img_path.replace(".png", ".png")
mask_path = mask_path.replace("rgb", "label")
img = cv2.imread(img_path)
mask = cv2.imread(mask_path)
for i in range(augment_times):
segmap_mask = SegmentationMapsOnImage(mask, shape=img.shape)
# 对 RGB 图像和 mask 掩码图同时进行增强
aug_det = seq.to_deterministic()
aug_img = aug_det.augment_image(img)
segmap_aug = aug_det.augment_segmentation_maps(segmap_mask)

aug_mask = segmap_aug .get_arr()
aug_mask = np.array(aug_mask, dtype=np.uint8)
thresh, aug_mask_bin = cv2.threshold(aug_mask, 127, 255, cv2.THRESH_BINARY)
# 定义结构元素
kernel = np.ones((5,5), np.uint8)

# 对掩码图像进行腐蚀操作
aug_mask_bin = cv2.erode(aug_mask_bin, kernel, iterations=2)

# 保存增强后的图像
output_name = os.path.splitext(img_name)[0] + '_aug_{}'.format(i) + os.path.splitext(img_name)[1]
output_path = os.path.join(output_folder_path, output_name)
output_mask_name = os.path.splitext(img_name)[0] + '_aug_{}'.format(i) + os.path.splitext(img_name)[1]
output_mask_path = os.path.join(output_folder_path.replace("rgb", "label"), output_mask_name)
cv2.imwrite(output_path, aug_img)
cv2.imwrite(output_mask_path, aug_mask_bin)

# 测试
if __name__ == '__main__':
images_folder_path = './MaskRCNN/rgb'
output_folder_path = './MaskRCNN/rgb_aug'
data_augmentation(images_folder_path, output_folder_path)

(3)从rgb和mask图生成coco数据

四、开始训练

运行json_to_dataset.py将标注的json图像转换为数据集。

dataset.py中的load_shapes中添加自己的分类,同时在最后的循环中也添加自己的分类。

train.pyShapesConfig修改图片大小,IMAGE_MIN_DIMIMAGE_MAX_DIM两个图片大小可以一样,NUM_CLASSES后面的数字是分的类