一、自定义信号和槽
实现功能:定义两个类,mysignal类,myslot类。mysignal类发出信号hello,myslot响应信号打印Hello World。
(1)创建类
首先右键项目-添加新文件-创建新的C++类,基类选择QObject。

(2)自定义信号和槽函数
自定义信号写到signals下。返回值是void,只需要声明,不需要实现。可以有参数,可以重载。
1
2
3
4
5
6
7
8
9
10
11
12
13
14
15
16
17
18
19
|
#ifndef MYSIGNAL_H
#define MYSIGNAL_H
#include <QObject>
class MySignal : public QObject
{
Q_OBJECT
public:
explicit MySignal(QObject *parent = nullptr);
signals:
void hello();
public slots:
};
#endif
|
自定义槽函数写在public slots下。返回值是void,需要声明,也需要实现。可以有参数,可以重载。
1
2
3
4
5
6
7
8
9
10
11
12
13
14
15
16
17
18
19
|
#ifndef MYSLOT_H
#define MYSLOT_H
#include <QObject>
class MySlot : public QObject
{
Q_OBJECT
public:
explicit MySlot(QObject *parent = nullptr);
signals:
public slots:
void printhello();
};
#endif
|
实现槽函数:
1
2
3
4
5
6
7
8
9
10
11
12
13
14
|
#include "myslot.h"
#include <QDebug>
MySlot::MySlot(QObject *parent) : QObject(parent)
{
}
void MySlot::printhello()
{
qDebug("Hello World!");
}
|
(3)创建两个类的对象并使用connect进行连接
首先在widget.h中声明两个类的指针,然后在widget.cpp中new两个对象。
1
2
3
4
5
6
7
8
9
10
11
12
13
14
15
16
17
18
19
20
21
22
23
24
25
26
27
28
|
#ifndef WIDGET_H
#define WIDGET_H
#include <QMainWindow>
#include "mysignal.h"
#include "myslot.h"
namespace Ui {
class widget;
}
class widget : public QMainWindow
{
Q_OBJECT
public:
explicit widget(QWidget *parent = 0);
~widget();
private:
Ui::widget *ui;
MySignal * mysignal;
MySlot * myslot;
};
#endif
|
1
2
3
4
5
6
7
8
9
10
11
12
13
14
15
16
17
18
19
|
#include "widget.h"
#include "ui_widget.h"
widget::widget(QWidget *parent) :
QMainWindow(parent),
ui(new Ui::widget)
{
ui->setupUi(this);
this->mysignal = new MySignal;
this->myslot = new MySlot;
connect(mysignal, &MySignal::hello, myslot, &MySlot::printhello);
}
widget::~widget()
{
delete ui;
}
|
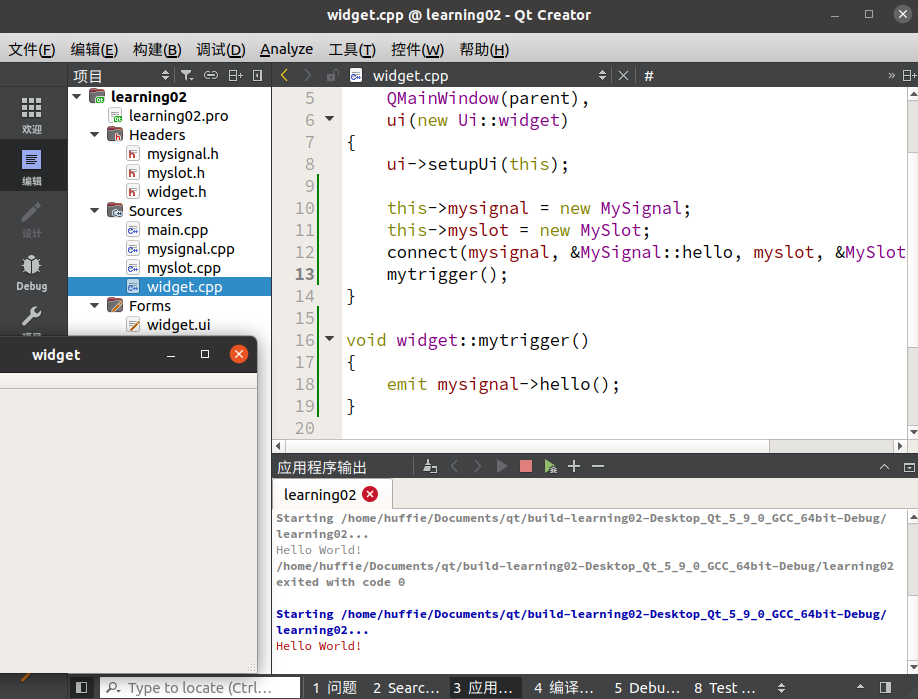
(4)创建触发函数
只有上面的代码,虽然创建了两个类,也定义了信号和槽函数,但是缺少触发条件,此时运行程序,程序无反应。
在widget.h的widget类的private中声明触发函数:
1
2
3
4
5
6
7
8
9
10
11
12
13
14
15
16
17
18
19
20
21
22
23
24
25
26
27
| #ifndef WIDGET_H
#define WIDGET_H
#include <QMainWindow>
#include "mysignal.h"
#include "myslot.h"
namespace Ui {
class widget;
}
class widget : public QMainWindow
{
Q_OBJECT
public:
explicit widget(QWidget *parent = 0);
~widget();
private:
Ui::widget *ui;
MySignal * mysignal;
MySlot * myslot;
void mytrigger();
};
#endif
|
在widget.cpp下方定义触发函数,并在widget中添加触发函数:
1
2
3
4
5
6
7
8
9
10
11
12
13
14
15
16
17
18
19
20
21
22
23
24
25
| #include "widget.h"
#include "ui_widget.h"
widget::widget(QWidget *parent) :
QMainWindow(parent),
ui(new Ui::widget)
{
ui->setupUi(this);
this->mysignal = new MySignal;
this->myslot = new MySlot;
connect(mysignal, &MySignal::hello, myslot, &MySlot::printhello);
mytrigger();
}
void widget::mytrigger()
{
emit mysignal->hello();
}
widget::~widget()
{
delete ui;
}
|
二、信号的连接与断开
2.1 信号连接信号
connect不仅可以连接信号与槽,也可以连接信号与信号,实现当触发一个信号时,由该信号继续触发另一个信号。
1
| connect(btn, &QPushButton::clicked, mysignal, &MySignal::hello);
|
2.2 信号与槽断开
断开信号使用disconnect关键字,其参数与connect完全相同。
1
| disconnect(btn, &QPushButton::clicked, mysignal, &MySignal::hello)
|
 微信支付
微信支付 支付宝
支付宝